Dealing With Emergencies
CPR
Steps of CPR
CPR (cardiopulmonary resuscitation) is pushing down on a person’s chest and breathing into his or her mouth. It is used in emergencies when someone’s heart stops beating, or when he or she is not breathing normally (may be gasping for breath) or is not breathing at all.
CPR works to move blood to the person’s brain to help prevent brain damage. CPR can help keep someone alive until a health professional arrives.
The steps of CPR are C-A-B:
- C for compression
- A for airway
- B for breathing
The CPR Basics has the basic steps for CPR. Use it for quick information on hand placement for chest compression, compression rates, compression depth, and ratio of compressions to rescue breaths.
The American Heart Association recommends taking a class on how to give CPR and then use the steps below as a reference.
Step 1. Check to see if the person is conscious.
Tap or gently shake the person and shout, “Are you okay?” But do not shake someone who might have a neck or back injury. That could make the injury worse.
If the person does not respond, follow these steps.
Adults and older children who have reached puberty
- For an adult or an older child who has reached puberty (body hair or breast development):
- Call 911 or other emergency services.
- Get an AED if there is one nearby.
- Start CPR.
Babies and young children until the age of puberty
- For a baby or young child who has not reached puberty:
- Start CPR.
- Do CPR with rescue breaths for 2 minutes.
- Call 911 or other emergency services.
- Get an AED if there is one nearby.
- Note: If there is another person with you, one person should call 911 while the other starts CPR.
Step 2: Start chest compressions.
For an adult or an older child who has reached puberty
- Kneel next to the person.
- Use your fingers to locate the end of the breastbone, where the ribs come together.
- Place two fingers at the tip of the breastbone.
- Place the heel of the other hand just above your fingers (on the side closest to the person’s face).
- Use both hands to give compressions. Stack your other hand on top of the one that you just put in position. Lace the fingers of both hands together, and raise your fingers so they do not touch the chest.
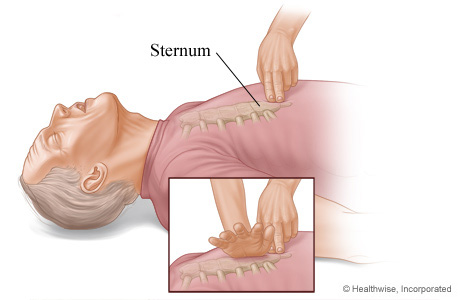
Positioning your arms and body for doing chest compressions:
- Straighten your arms, lock your elbows, and center your shoulders directly over your hands.
- Press down in a steady rhythm, using your body weight. The force from each thrust should go straight down onto the breastbone, pressing it down at least 2 in. (5 cm). Be sure to let the chest re-expand at the end of each compression.
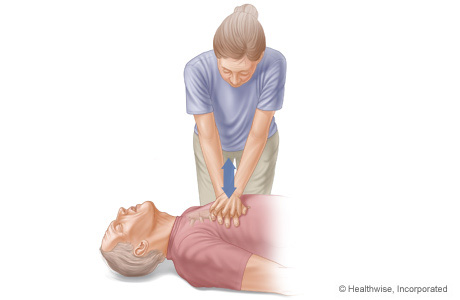
- If you are not trained in CPR, give at least 100 chest compressions a minute.Push hard and push “fast.” (Fast means to push between 1 and 2 times a second.)
- If you are trained in CPR, see Step 3: Start rescue breaths.
- Keep giving at least 100 chest compressions a minute until help arrives or the person is breathing normally.
For a child 1 year of age to puberty
- Kneel next to the child.
- Use your fingers to locate the end of the child’s breastbone, where the ribs come together.
- Place two fingers at the tip of the breastbone.
- Place the heel of the other hand just above your fingers (on the side closest to the child’s face).
- Use the heel of one hand to give compressions. If you need more force for a larger child, use both hands as you would for an adult.
Positioning your arms and body for doing chest compressions:
- Straighten your arm, lock your elbow, and center your shoulders directly over your hand.
- Press down in a steady rhythm, using your body weight. The force from each thrust should go straight down onto the breastbone, pressing down at least one-third of the depth of the child’s chest [about 2 in. (5 cm)]. Be sure to let the chest re-expand at the end of each compression.
- Give at least 100 chest compressions a minute.Push hard and push “fast.” (Fast means to push between 1 and 2 times a second.)
- Rescue breathing is more important to do for children and babies than adults. Give 30 compressions to 2 breaths. See step 3: Rescue breaths.
- Repeat the cycle of 30 compressions and 2 rescue breaths until help arrives or the child is breathing normally.
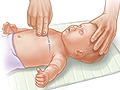
For a baby younger than 1 year
- Kneel or stand next to the baby after putting him or her on a flat surface.
- Picture a line connecting the nipples, and place two fingers on the baby’s breastbone just below that line.
- Use just your two fingers to press the chest down at least one-third of the depth of the baby’s chest. Be sure to let the chest re-expand at the end of each compression. See a picture of hand placement for baby CPR.
- Give at least 100 chest compressions a minute.Push hard and push “fast.” (Fast means to push between 1 and 2 times a second.)
- Rescue breathing is more important to do for children and babies than adults. Give 30 compressions to 2 breaths. See step 3: Rescue breaths.
- Repeat the cycle of 30 compressions and 2 rescue breaths until help arrives or the baby is breathing normally.
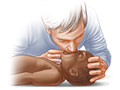
Step 3: Rescue breaths.
If you are not trained in CPR, it’s okay to only give chest compressions. Studies have shown that CPR can work well with chest compressions alone.
Rescue breathing is more important to do for children and babies than adults.
If you are trained in CPR:
- Give 30 compressions, then 2 rescue breaths.
- Repeat the cycle of 30 compressions and 2 rescue breaths until help arrives or the person is breathing normally.
There may be a pocket mask at a nearby first aid station or in a first aid kit. You can use the mask to give rescue breaths, but don’t delay starting CPR to find one.
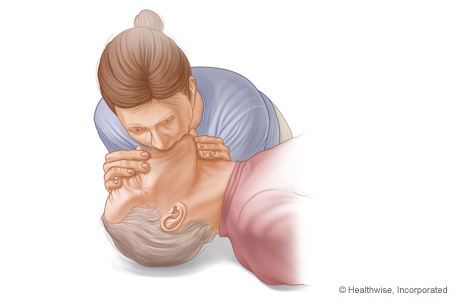
To give rescue breaths:
- Put one hand on the person’s forehead.
- Pinch the person’s nostrils shut with your thumb and finger.
- Put the fingers of your other hand under the bony part of the lower jaw near the chin. Tilt the chin upward to keep the airway open. Do not tilt the head if you think there is a neck injury.
- Take a normal breath (not a deep one), and place your mouth over the person’s mouth, making a tight seal. For a baby, place your mouth over the baby’s mouth and nose. Blow into the person’s mouth for 1 second, and watch to see if the person’s chest rises. See a picture of rescue breathing for a baby.
- If the chest does not rise, tilt the person’s head again, and give another breath.
- Between rescue breaths, remove your mouth from the person’s mouth and take a normal breath. Let his or her chest fall, and feel the air escape.
Using an automated external defibrillator (AED)
Automated external defibrillators (AEDs) are machines that are programmed to safely deliver an electrical shock to a person who has collapsed from a heart problem. Each AED has instructions for that machine.
AEDs are in many public places. Before you use an AED, follow all the steps for CPR. To use an AED, place it next to the person who has collapsed and turn it on. The AED has a computer inside that will tell you what to do next.
Current as of: June 26, 2019
Author: Healthwise Staff
Medical Review:William H. Blahd, Jr., MD, FACEP – Emergency Medicine & Adam Husney, MD – Family Medicine & Kathleen Romito, MD – Family Medicine